
Tatte Bakery Focaccia


Tatte Bakery Focaccia
Ok, so when was the last time or ever did you have freshly baked focaccia? I’m pretty sure the last time I had it was right before I got severe food poisoning in Florence while studying abroad, and hadn’t really gravitated towards it since. I also tend to have other favorite carbs to eat instead. I thought it was at the bottom of the list of things to eat. BUT, I also am determined to feel much more comfortable with baking breads this year, so I was determined not to judge.
Liz and I walked into our baking class at Tatte Bakery in late January and I thought to myself “Oh, Boo” when I saw the first recipe we were going to do. I thought oh how boring. We all know where this story is going. That I changed my mind about it right? Yeah, yeah I think I really did.
What really makes focaccia special is the herbs on top, as well as being freshly baked. So unless you have a bit family, you might need to share the fruits of your labor here. This recipe will make two sheet pans of focaccia. But it’s worth it.
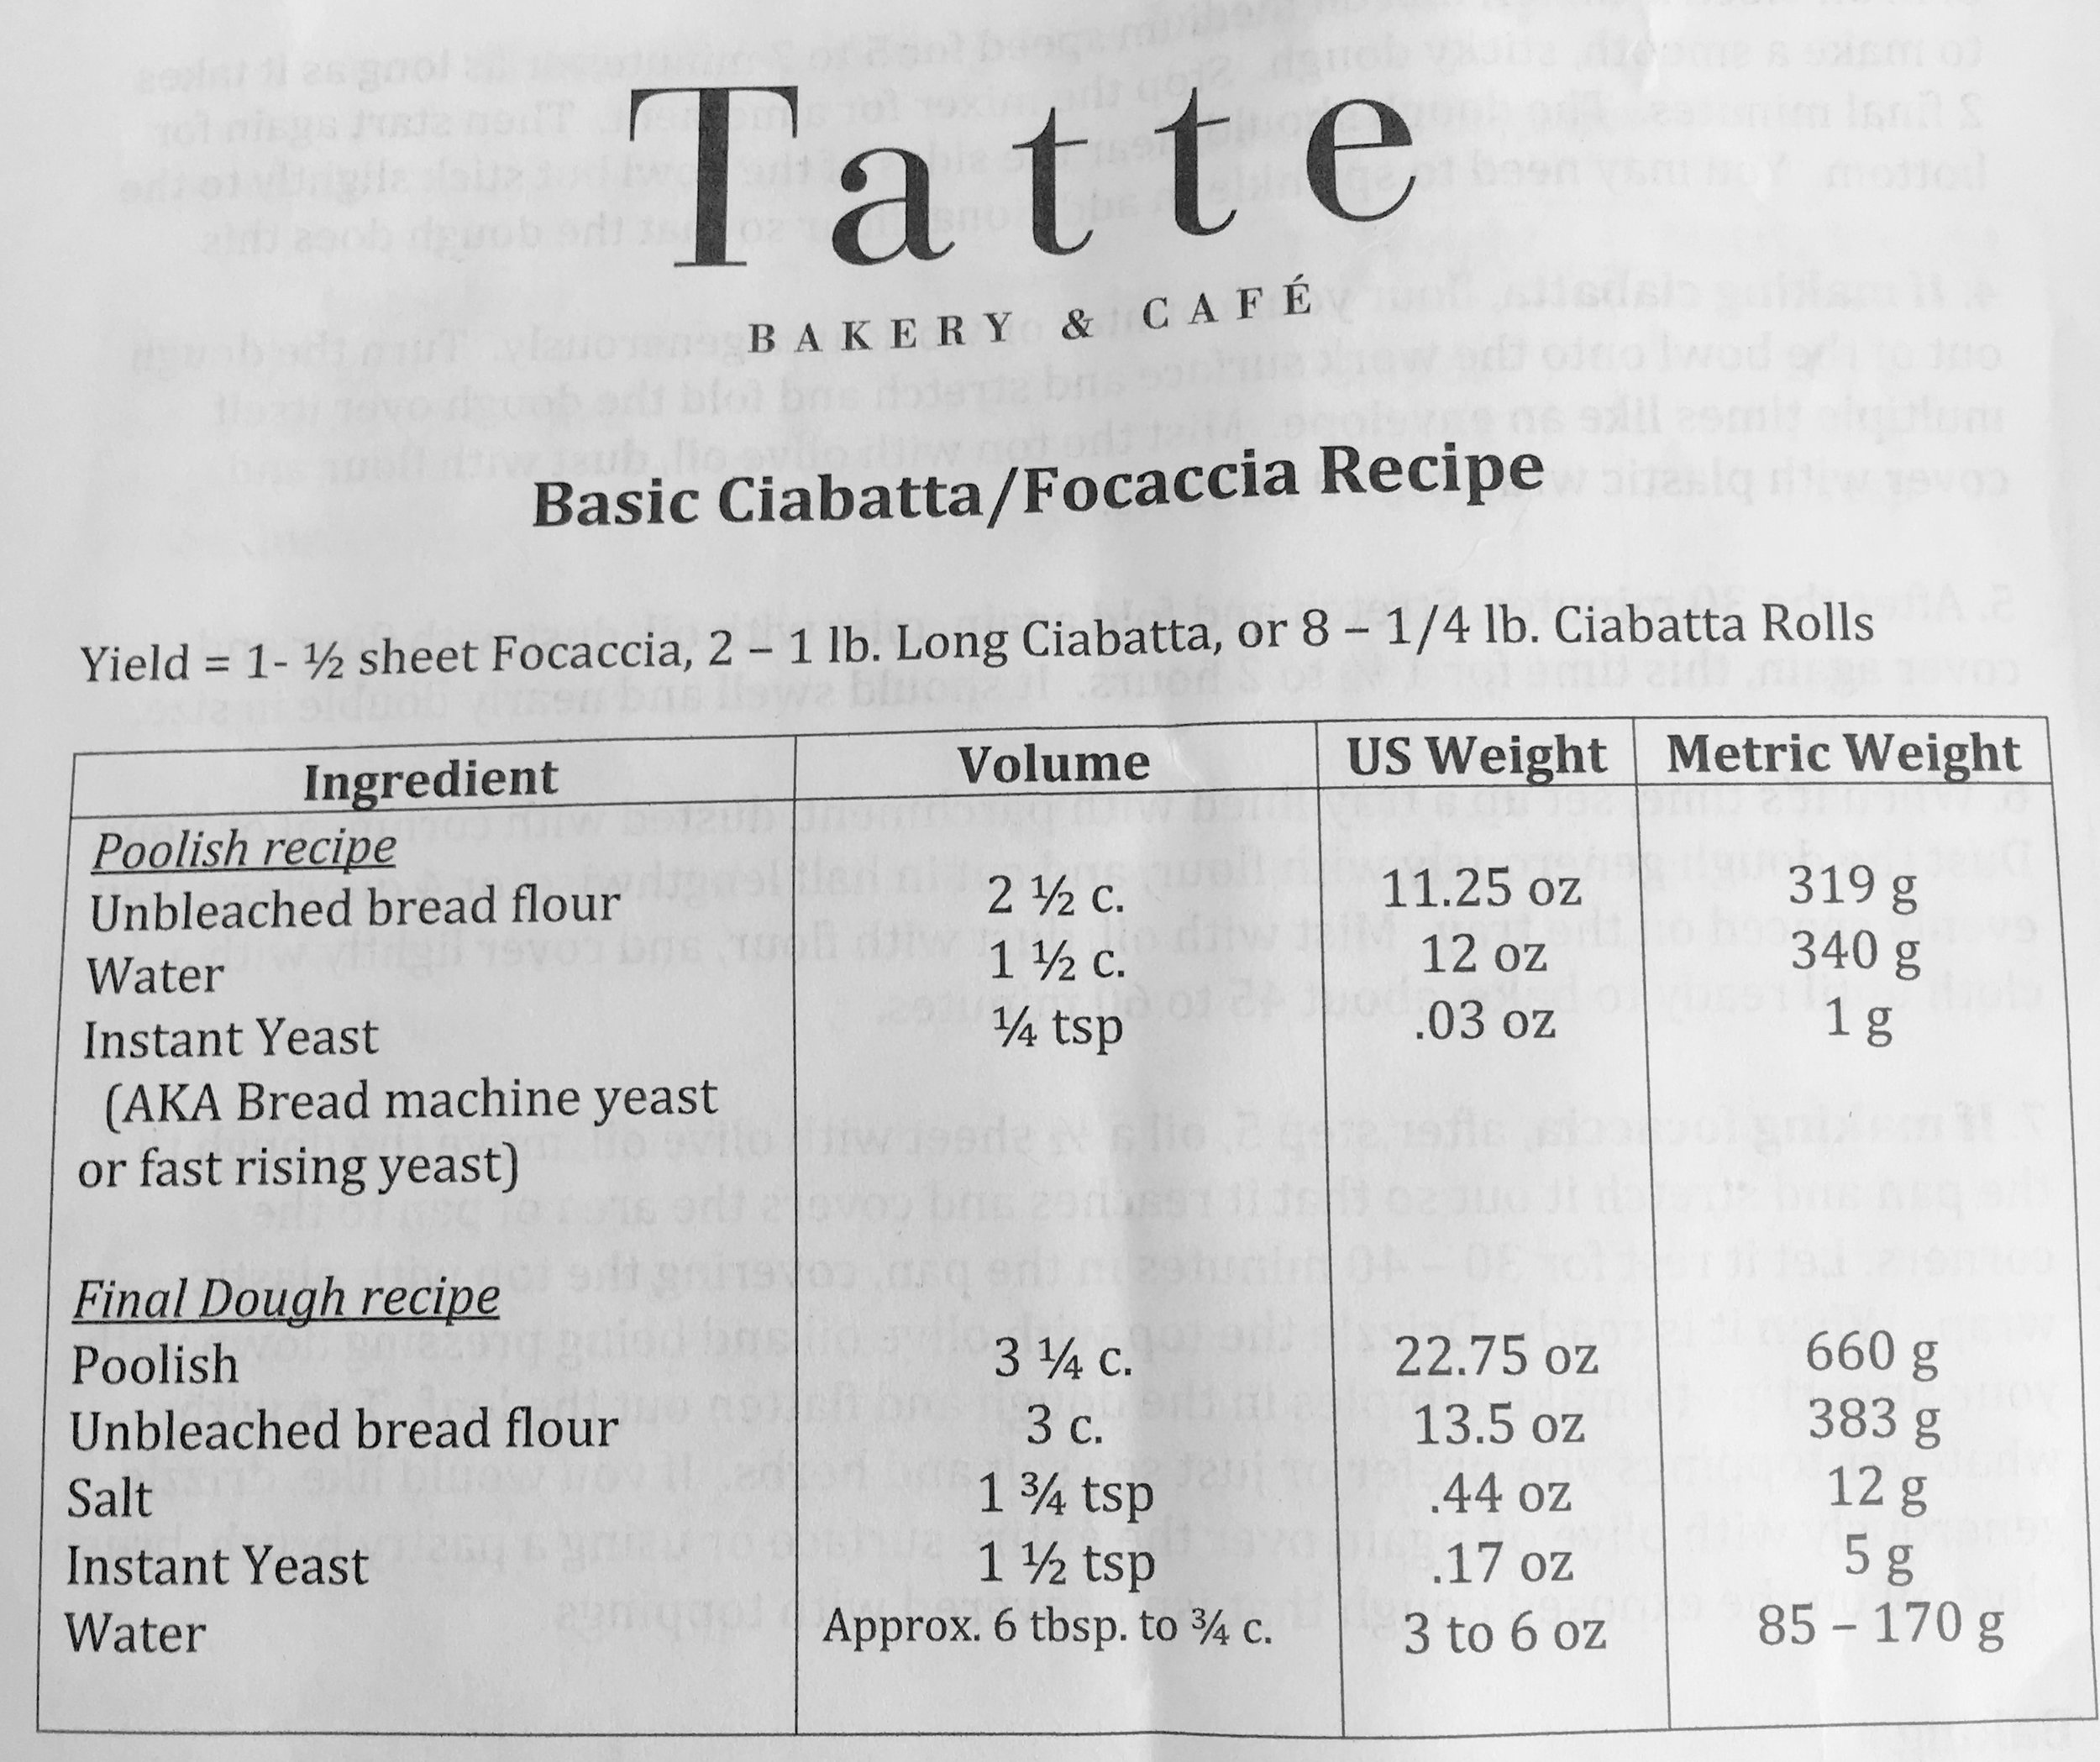
— First let’s talk this little chart. It’s the base for this entire recipe. You will need it. You can certainly choose to use the Volume or US Metric on this, but if you want to bake, and bake the way bakers do, get a scale and use Metric Weight.
SO, when I started learning about bread I went in way over my head and bought Tartine’s Bread Book. Yeah, so it was super intense, the Tatte Bakery class really helped me figure out what the F they were talking about along the way. The first thing to learn is what Poolish is.
Polish is your first proof dough, it’s usually a pretty wet consistency, this recipe even goes so far to call it “Pancake Batter-like”. A lot of the time, this is where you will let the yeast really start to rise.
The second thing to note here is that the recipe calls for Instant Yeast. This is different than the little packets you add warm water to. It usually comes in a larger bag. There are TWO kinds of the best brand of Instant Yeast. What I was told is that the RED label is more for enriched breads (think Brioche or Challah) and the GOLD label is more for “normal breads” or non-enriched, and non-natural -yeast breads like sourdough. So focaccia, baguettes, ciabatta, etc. all fall under this category. Could you switch it out for each other, the bakers at Tatte said yes, for a home cook you definitely can. Also, my whole foods only carries the Red Label, so I had to order my gold on amazon here.
Polish Ingredients:
- 319g Unbleached Bread Flour
- 340g Water
- 1g Instant Yeast
Poolish Instructions
Stir together the flour, water and yeast in a bowl until all the flour looks hydrated (mixed together). It should look like pancake batter. Cover the bowl with plastic wrap and let sit at room temperature for 4 to 6 hours. If not using right away, refrigerate immediately and it will keep for one day.
hint make the night before and stick in fridge
Final Dough Ingredients:
- 660g Poolish (your recipe above should be about 660g)
- 383g Unbleached Bread Flour
- 12g Salt
- 5g Instant Yeast
- 85-170g Water
Final Dough Instructions:
- Remove the polish from the refrigerator one hour before making the dough to take the chill off.
- In a four-quart mixing bowl, stir together the flour, salt and yeast and stir together. Add the polish and 6 Tbs of the water. If there is still some loose flour, add additional water and continue to mix (this is why there is a variable amount of water in the ingredient list).
- In an electric mixer (or kneading on a wooden surface with a little flour), mix on medium speed for 5 to 7 minutes or as long as it takes to get a smooth , sticky dough. Stop the mixer for a moment. Then start again for the final few two minutes. The dough should clear the sides of the bowl, but stick slightly to the bottom. You may need to sprinkle additional flour so that the dough does this. if you are hand-kneading, there is a place where kneading the dough it is still sticky but starting to feel like elastic dough. It shouldn’t be shiny, but looks like a pretty ball of dough
- Flour your tour counter or work area generously. Turn the dough out of the bowl on to the work surface and stretch and fold the dough over itself multiple times like an envelope (fold like a letter). Mist the top with olive oil, dust with flour and cover with plastic wrap for a half an hour.
- After 30 minutes, repeat the stretching and folding step, mist with olive oil , dust with flour and cover again - this time for 1.5 to 2 hours. It should double in size during that time.
- Oil a half sheet pan with olive oil, and move your dough to the pan. Stretching the dough so it reaches and covers the area of the pan to the corners. remember stretch not rollLet it rest for 30-40 minutes in the pan, covering the pan with plastic wrap. When it’s ready, drizzle the top with olive oil and press down with your finger tips to make dimples in the dough and flatten it out a bit. Top with whatever toppings you want (ZA’ATAR SPICES Y’ALL). Then drizzle generously with olive oil again with a pastry brush, making sure to cover any areas not covered in your toppings.
- Bring your oven to 500F.
- Using a clean spray bottom filled with water, mist the tops of the loaves lightly, not saturating them with water. Place in the pre-heated oven.
- Before closing the door, quickly spray the sides of the oven with your spray bottle — 2-3 sprays on each side. Now you are going to wait 30 seconds, open up the oven slightly and spray again, and then repeat that 4 MORE TIMES. In total, you should do this for about 2-3 minutes.
- After the final spray, turn down the oven to 450F and continue baking for ten minutes, then open the oven rotate the pans so they bake evenly and let cook for another 5-10 minutes until the bread is golden.
- Carefully remove the loaves from the baking pan and cool completely on a wire rack.


I have learned that focaccia-- seen here with TONS of za'atar spices on top, is the best for a good veggie sandwhich. It really does great with avocado, roasted red peppers, tomatoes, lettuce, hummus and some hot sauce.
For Boston/New England Locals:
For those local to Boston/New England I highly recommend the classes at Tatte. They are really wonderful teachers and you can't beat going home with TONS of fresh bread. Check out all their classes offered here.